Monday, September 26, 2016

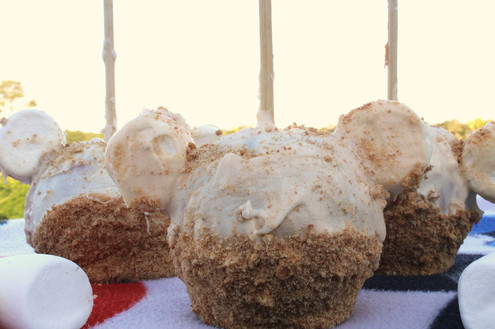
Disney's Apple Pie Caramel Apple's!

First off, I'm a huge Disney lover. My brother Jeffrey is an athlete for cycling in the Special Olympics, at ESPN Wide World of Sport's, at Disney World this coming up weekend so this weekend we got a little Disney crazy to get in the Disney mood (but let's be honest here, I'm always in the Disney mood). So to celebrate I thought i'd make some Disney Apple Pie Caramel Apple's! Which were delicious by the way. 


What you need: 
  • 4 large Granny Smith apples
  • 5-6 c. caramels (or appx. 1 bag Kraft Caramel bits)
  • 7-8 cinnamon graham crackers 
  • 1 1/2 lbs. melting chocolates (or chocolate chips)
  • cinnamon and sugar, to taste (appx 2 Tbsp sugar + 1/8 tsp. cinnamon)
  • 8 large marshmallows (if you want to make "ears" which in my opinion makes it more magical)

L


What to do:

1. Scrub apples and dry with a dishcloth or paper towel. This is to get the wax coating off 

2. Melt caramel in the microwave (in a micvrowave-safe dish) for 30 seconds at a time until caramel is nice and melted or follow directions on package if using the Bits. 

3. Place caramel apple sticks or cop sticks into the top of each apple and dip each apple into the caramel until fully coated, rotating the apple as needed. Let excess caramel drip off and them place on wax paper. ( Make sure you spray the wax paper with Pam or other non stick spray before placing them on paper, they WILL stick to paper if you don't) 

4. If you want to make ears take marshmallows dip a side in the caramel and place on the the top of the apples to make ears, hold for about 15 seconds. Let sit for about an hour or longer if you want. ( you can also put in fridge )

5. Put graham crackers in zip block bag , and smash with mallet. Make sure they are really broken down. Place in bowl and set aside. 

6. Melt chocolate in a microwave-safe dish in the microwave until chocolate is just melted and there are no lumps. Dip each apple in the chocolate and allow chocolate to set up for a few seconds.

7. When chocolate has set a little, roll the bottom half in processed graham cracker crumbs, pat down hand just a tad. Sprinkle entire apple with cinnamon and sugar and set aside.


L
 With this treat I wanted to make it more kid friendly and have a little help, my other brother Jeremy (who's 11) help me mash the gram crackers and roll the chocolate covered apples in the gram crackers. My only tip is don't double dip from chocolate to gram crackers back to chocolate, we had to learn the hard way. Other then that , we had a blast making them and a blast eating them as well! I hope you enjoy and stay tuned for more Disney themed deliciousness!

Disney Flavored
Jessica   

Captain America M&M's Sugar Cookies

Have you seen the new Captain America- Civil War! We went last Thursday, and it was by far the best Marvel movie we've seen! Of course we also all rooted for the one and only Captain America. So to help celebrate the new movie, I thought it would be awesome to have some Captain America cookies! Can you say Yum?! They were such a hit in the house, especially with my 3 year old. 


What you will need:
  • 3 cups all-purpose flour
  • 1/2 tsp baking powder
  • 1/2 tsp salt
  • 1 cup (2 sticks) butter
  • 1-1/3 cups granulated sugar
  • 2 large eggs
  • 2 tsp vanilla extract
  • red food color
  • blue mega M&M's
    What to do:
  1. In a bowl sift together flour, baking powder & salt, and Set the bowl aside
  2. In a mixer bowl with paddle attachment - beat butter until soft!
  3. Add sugar & beat until light & fluffy.
  4. Add in eggs one at a time - beating after each one.
  5. Add vanilla
  6. Add dry mixture & slowly beat in until combined all together. 
  7. Remove half the dough & wrap in plastic wrap. Flatten out to 4x4" piece &  refrigerate.
  8. With the rest of the dough beat in food color to your desired pigment. I added close to 40 drops of gel color to get this red.
  9. *Also- adding this much color will make your dough super sticky. You may want to coat hands in flour for easier handling. 
  10. Remove red dough & separate into 2 equal parts. Wrap with plastic & refrigerate at least 30 minutes.
  11. After it has chilled - remove one of the red dough packs
  12. Place between 2 layers of parchment & roll our to a large rectangle
  13. Remove top layer of parchment & roll dough into a log. This will be your center!
  14. Wrap back up with parchment & put in freezer while you work with the next layer.
  15. Remove your white dough from refrigerator & roll out in the same way you did the first batch. Once you have a thin, even rectangle - place your red log on the white dough & roll into a larger log.
  16. Repeat these steps for the final red dough.
  17. When you are done you should have a large red log
  18. Preheat oven to 350 conventional
  19. baking sheets with parchment paper
  20. Take the log & slice it into 1/4 inch rounds 
  21. Place on baking sheet 2 inches apart so you dont risk them touching
  22. Bake 9-11 minutes
  23. Right when you remove from oven - place your blue M&M's in the center before the cookies cool down!


Serve and enjoy! This is a recipie the whole family can enjoy making and of course eating! When the movie comes out on DVD, whip these up and make it a movie night for everyone! I'm sure they wont disappoint! Thanks for joining us here at Disney Flavored! See you Monday! 


Jessica 

Disney's Pixars Mike and Sully Cupcakes and Cake Jar!

Did you see those cute Mike and Sully Cake Jar's that Disney Family made and posted on there facebook! So cute right? I thought I'd give it a try and make some cupcakes to go along with it! 
Bentley has always love the movie "Monster's Inc" and "Monsters University". So of course he helped me when I told him I was making them for our vacation to go see the big mouse this weekend. 


 What do you need:

Mason jars
Vanilla cake mix and recipe ingredients (water, oil, and eggs)
Vanilla frosting
Food coloring (neon green, neon blue, purple)
Small pastry bag and hairy icing tip

What to do : CAKE JARS:

1. follow instructions on the cake box 

2. After you have your cake mix already separate cake mix into 3 bowls

3. take you neon food coloring and mix in Blue into one bowl, Green into one bowl, and in your smallest bowl use purple food coloring.

4.  Begin filling jars. For the Mike jar, fill jar halfway with green cake mix. For the Sulley jar, add a layer of blue cake mix, then add small drops of purple cake mix on the sides. Continue adding purple spots as you layer in blue cake mix. Do not fill more than halfway. 

5. I baked mine for about 20 Minutes , but keep watch on them cause they can become brown on the bottom if you cook them too long. 

6. Let cakes cool completely before icing.

7. For the MIke Cake put a qutarter dot of icing in the middle for the white of his eyes, and using the blue food coloring  make blue icing and  put a dime size dot on top of the white icing. 

8, Making Sully use the pastry bag , put the rest of your blue icing in the bag and pipe the icing on the cake making it look like hair.

9. In a separate pastry bag using the purple food coloring make purple icing, and pipe the icing looking like hair !

10. Serve and enjoy! 


Now if you have any cake mix left , make some cupcake with them! Just put the cake mix in cupcake liners , in cupcake pans the same way you did the mason jars (only fill half way) , bake for as long as the box says too and icing just like you did for the mason jars! Serve and Enjoy! These are even good for those mom who wants a snack on the go! Wont be disappointed. 


Sunday, September 25, 2016

Mickey Mouse Rice Krispie Treats

Hi ho, hi ho, off to Disney World we go (I really hope you sang along with me)! We are currently at Special Olympics in the ESPN Center, at Disney World. My brother Jeffery who is Autistic, he competed on Saturday for cycling. So to celebrate I made Mickey Mouse Rice Krispie Treats! Super easy, and you can mix it up in so many ways it's crazy! Covered with chocolate, dyed red or black, and with chocolate chips! 


What you will need: 
6 cups Rice Krispie Cereal 
3 tablespoons of butter
4 cups of marshmallows ( I use mini marshmallows) 
Mickey cookie or sandwich Cutter.  


What to do: 
1. Spray Large cookie sheet with non stick cooking spray, put aside.
2. In large Saucepan melt butter,
3. Add marshmallows and stir until completely melted 
4. Remove from heat
5. Add Kellogg's Rice Krispie's Cereal. Stir until well coated
6. Poor Krispie mix on cookie sheet
7. Spray non stick cooking spray or butter on spatula or hands ( i used my hands ) flatten out Krispies covering the whole pan. 
8. Let sit for 5-10 minutes.
9. Using Mickey Cutter cut Mickey Out.  (Bentley Helped me with this part)! 
10. Serve and enjoy!

Now normally I would cover them with chocolate right after they have set! I  just dip them in chocolate and set a side to dry,  but we needed a less messy snack so I just let them be. Bentley and My brothers loved them for our trip!